Cuda + Pytorch installation for Ubuntu
This tutorial provides a step-by-step guide to install Cuda and PyTorch on an Ubuntu system. It covers the installation process for both Python and C++ setups, ensuring compatibility with your hardware and software configurations.
System Specifications
The following setup is tailored for systems with:
- Processor: Intel i7 8th Generation
- GPU: Nvidia GTX 1060 6GB
- Memory: 16 GB RAM
- Storage: 512 GB SSD
Software Versions Installed
- GCC Version: 11
- NVIDIA Driver: 470
- Python Version: 3.10.16
- CUDA Toolkit Version: 12.0.76
- PyTorch (Python and C++)
Installation Steps
1. Install GCC
To ensure compatibility with CUDA, install GCC version 11.
wget https://ftp.gnu.org/gnu/gcc/gcc-11.3.0/gcc-11.3.0.tar.gz
tar -xvf gcc-11.3.0.tar.gz
cd gcc-11.3.0
Use the following commands to configure GCC 11 as an alternative (this installs both choices in update-alternatives and allows you to choose either of them based on the compatible versioning):
sudo update-alternatives --install /usr/bin/gcc gcc /usr/bin/gcc-12 12
sudo update-alternatives --install /usr/bin/gcc gcc /path/to/gcc-11 11
sudo update-alternatives --config gcc
Verify the installation
gcc --versionOutput:
 Ensure it shows gcc (Ubuntu 11.x).
2. Install NVIDIA GPU Driver
First, remove any existing NVIDIA drivers:
sudo apt remove --purge '^nvidia-.*'
sudo apt autoremove
sudo apt clean
Update the package list and install Compatible NVIDIA Driver XXX (As per my hardware, the most stable version that I can use is 470)
sudo apt update
sudo apt install nvidia-driver-470
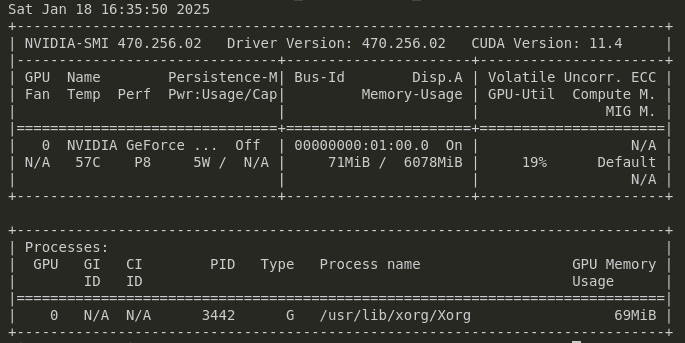
sudo rebootCheck installation:
nvidia-smiOutput:
3. Install CUDA Toolkit
Download and isntall the CUDA Toolkit:
wget https://developer.download.nvidia.com/compute/cuda/11.8.0/local_installers/cuda_11.8.0_520.61.05_linux.run
chmod +x cuda_11.8.0_520.61.05_linux.run
sudo sh cuda_11.8.0_520.61.05_linux.run --silent --toolkit
Add CUDA paths to your environment:
echo 'export PATH=/usr/local/cuda-11.8/bin:$PATH' >> ~/.bashrc
echo 'export LD_LIBRARY_PATH=/usr/local/cuda-11.8/lib64:$LD_LIBRARY_PATH' >> ~/.bashrc
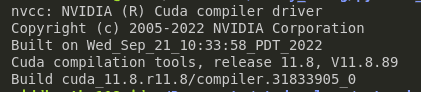
source ~/.bashrcVerify the CUDA installation
nvcc --versionOutput:
4. [OPTIONAL] Compatible Python version installation
If not present let's add python repositor:
sudo add-apt-repository ppa:deadsnakes/ppa
sudo apt install python3.10 python3.10-venv python3.10-dev
You can configure alternatives for Python versions if needed.
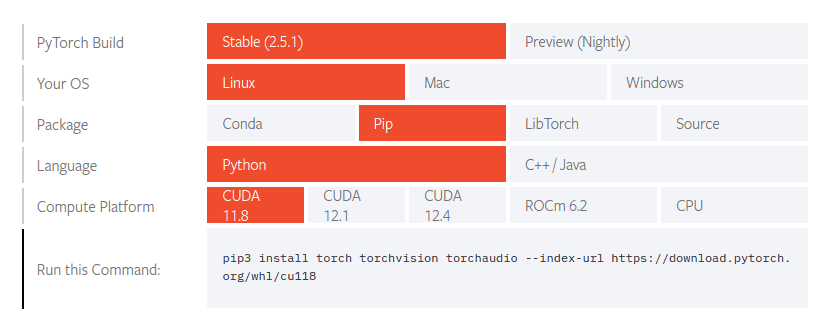
5. Install PYTORCH with CUDA support using PIP
pip install torch torchvision torchaudio --index-url https://download.pytorch.org/whl/cu118Test the installation in python
import torch
print(torch.cuda.is_available())
Output:

6. Install PYTORCH for C++
Install necessary tools like CMake:
sudo apt install cmake -yFollow the official Pytorch C++ setup guide here
7. Install cuDNN
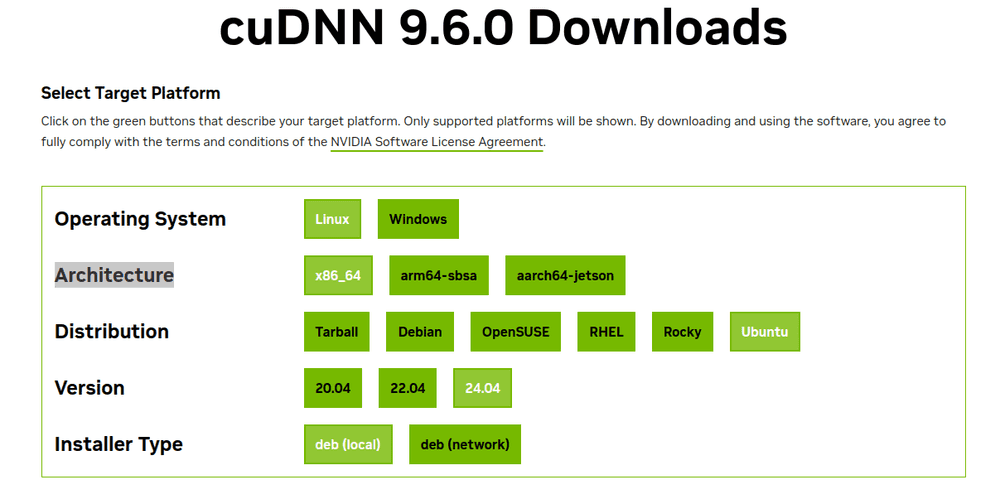 Download the appropriate cuDNN package from NVIDIA's website (e.g., version 9.6):
wget https://developer.download.nvidia.com/compute/cudnn/9.6.0/local_installers/cudnn-local-repo-ubuntu2404-9.6.0_1.0-1_amd64.deb
sudo dpkg -i cudnn-local-repo-ubuntu2404-9.6.0_1.0-1_amd64.deb
sudo cp /var/cudnn-local-repo-ubuntu2404-9.6.0/cudnn-*-keyring.gpg /usr/share/keyrings/
sudo apt-get update
sudo apt-get -y install cudnn-cuda-11
Link cuDNN libraries to CUDA paths:
sudo ln -sf /usr/lib/x86_64-linux-gnu/libcudnn* /usr/local/cuda/lib64/You have reached the end of the blog. Thanks for reading!
For any queries or issues, feel free to reach out to me via the contact page.